Automated Shopping Lists
Cooking is one of my favorite non-technical hobbies. My approach involves first finding a recipe my girlfriend and I might enjoy, then cooking and tweaking it a few times until we think the dish tastes great. Next, I cook it once more, but with extra care to take a good photo of the final result. I then combine the improved recipe with that photo to create what I call a 'recipe card' (see below). Finally, I print and laminate that card and store it in a 3D-printed stand I made for them.
While all of this is incredibly fun for me, writing shopping lists with all required
ingredients (usually for multiple recipes at once) truly is not. I, in fact,
Printing a shopping list by scanning recipe cards.
High-Level Overview
There are four major components to this project: A Raspberry Pi, which is essentially a Linux-based computer the size of a credit card, a tiny camera, a thermal printer, and the recipe cards, each equipped with a QR-code containing a unique ID. Using a Raspberry Pi for this project has several advantages, the most important being access to powerful libraries like OpenCV for recognizing and decoding QR-codes, and ESC/POS for sending commands to the printer via USB. It's also quite convenient to edit the code running on the Raspberry Pi, as I can SSH into it directly from VSCode using this plugin (crucial for easily adding new recipe data).
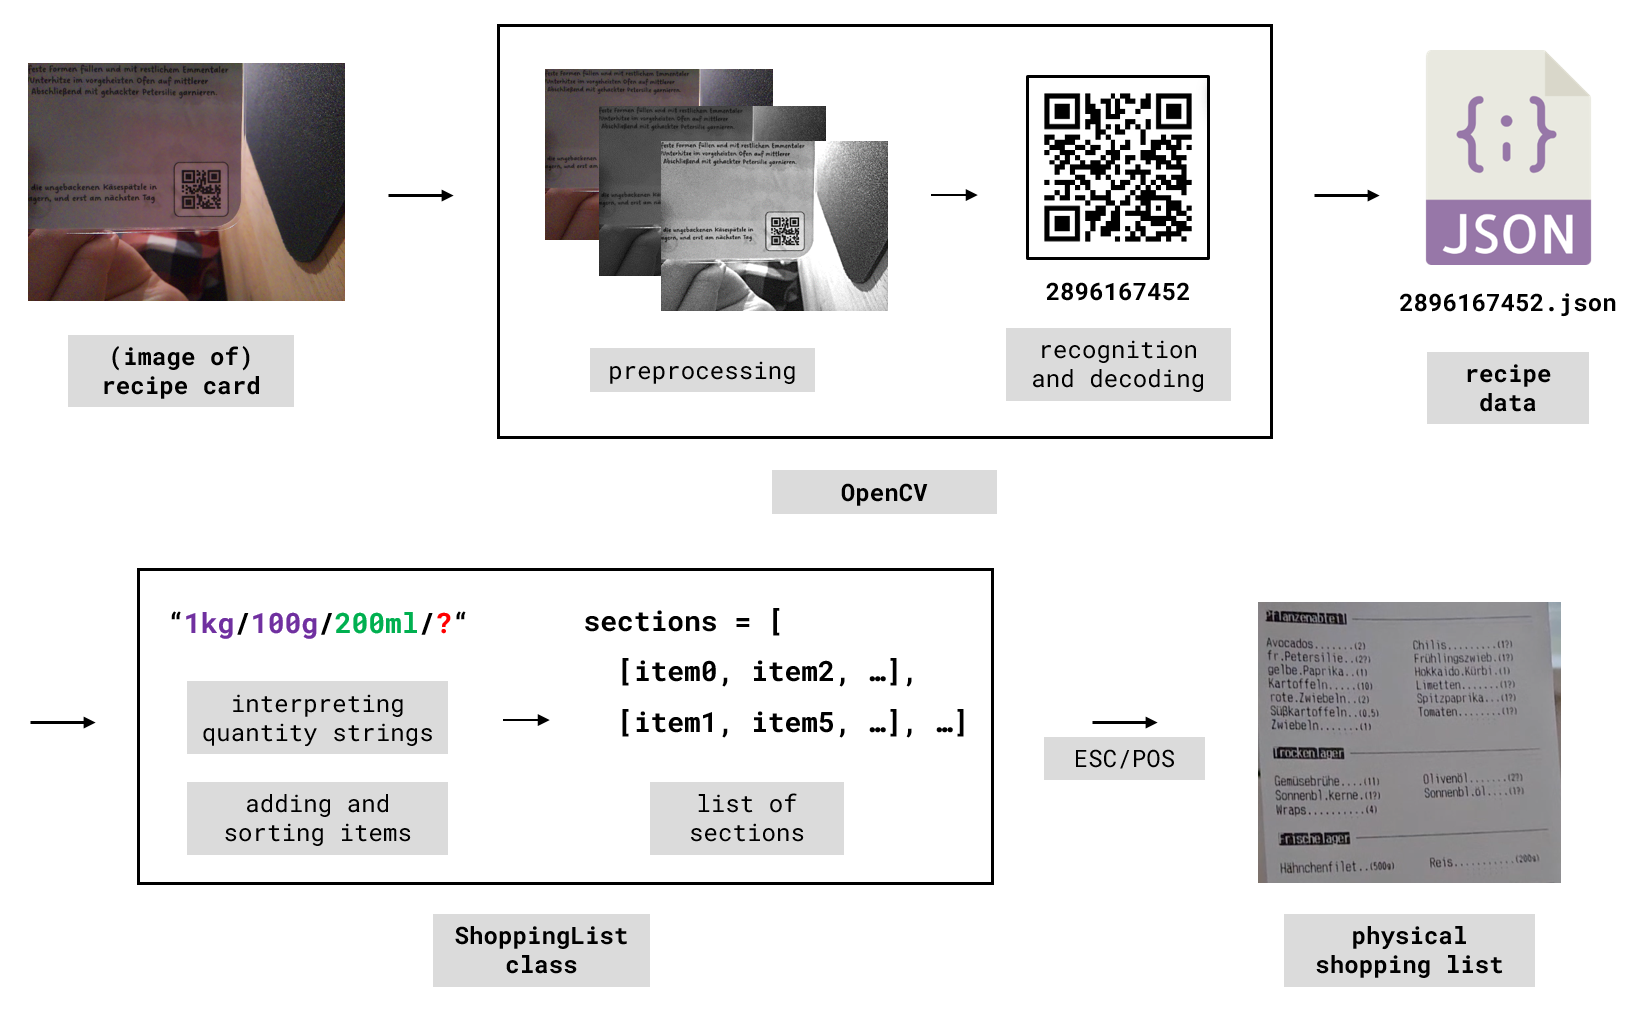
Conceptual flow from recipe card to shopping list.
To print a shopping list, there are two major steps: first, take an image of each
recipe card you wish to include, preprocess it (grayscale, sharpness, contrast etc.),
and extract the QR-code data, i.e. the unique
PY
                        generate.py > * | camera.py > scan_qrcode
                        shopping_list.py > ShoppingList.add_recipe
Relevant parts of the code to follow this project.
Codewise the project is actually quite simple. To follow along, you only need to understand three core ideas: How to generate unique IDs and corresponding QR-codes for each recipe. How to scan those codes back in. And how to handle recipe data to create an abstract representation of a shopping list. As usual, if you want to take a look at the full code, it's available on GitHub. A large portion of the project's overall complexity doesn't come from the code but from integrating all the components (both abstract and physical), as well as from designing the 3D-printed parts and dealing with the electronics. You can skip to the corresponding section to download all STL files or to see the wiring diagram, if you want.
Generating Unique IDs
To create unique IDs for each recipe, we'll use a hash function, specifically the
DJB2a hash. I already covered both the general concept of hashing and the specific
implementation details
in this project. We'll also need a
PY
                        with open("data.tsv", "r", encoding="utf-8") as file:
                            data = [
                                row.strip().split("\t")
                                for row in file if row.strip()]
                            data = [{
                                "name": row[0],
                                "id": (row[1] if len(row) > 1 else "")}
                                for row in data]
Reading data.tsv and organizing it into dictionaries.
Now we can do both: generate unique IDs and encode them as QR-codes. To do so, hash
each recipe name once and check whether the resulting ID is unique. If it isn't,
rehash until you get a unique ID. Then encode that ID in a QR-code and save it. Also
store the ID inside
PY
                        with open("data.tsv", "w", encoding="utf-8") as file:
                            ids = []
                            for row in data:
                                # if no id is provided create one from name
                                if not row["id"]: row["id"] = hash_djb2a(row["name"])

                                # make sure that it is unique then remember it
                                while row["id"] in ids: row["id"] = hash_djb2a(row["id"])
                                ids.append(row["id"])

                                # create qrcode and save it as png
                                code = qrcode.make(row["id"]).resize((512, 512))
                                code.save(f'output/{row["name"]}.png')

                                # save id to file and print it
                                file.write(f'{row["name"]}\t{row["id"]}\n')
                                print(f'{row["name"]} {row["id"]}')
Generating unique IDs and encoding them as QR-codes.
Scanning QR-codes
To scan a QR-code from an image there are three steps involved: preprocessing the image to increase code visibility, recognizing the code in the image (i.e. locating it plus determining its transformation), and decoding it to extract the data. As mentioned, for this project I choose to use OpenCV for the latter two steps. We will therefore examine different possible preprocessing techniques and their effects on a taken image.

Reducing image complexity by converting it to grayscale.
The first major step is converting the image to grayscale. This greatly reduces the complexity, as instead of three channels \((R,G,B) \in [0, 255]^3\), one for each primary color (red, green, blue), we end up with a single channel \(S \in [0,255]\), where \(S = 0\) is black and \(S = 255\) is white. It is also helpful to scale the image down as much as possible. In my setup, the camera captures images at \(1640 \times 1232\) pixels, and I was able to reduce them to just \(30\%\) of their size before the QR-code detector stopped recognizing anything.
PY
                        # capture frame and always convert to grayscale
                        frame = camera.capture_array("main")
                        frame = cv2.cvtColor(frame, cv2.COLOR_RGB2GRAY)

                        # always downscale to boost detection performance
                        h, w = frame.shape
                        size = (int(w * scale), int(h * scale))
                        frame = cv2.resize(frame, size)
Capture image, convert to grayscale, and downscale it.
Considering what defines a QR-code two aspects come to mind: edges and contrast, since it is essentially a grid of black and white squares. Therefore, it's sensible to enhance exactly these features. To emphasize edges in an image \(I\) subtract a blurred version \(B\) of the same image by applying the update \(I \gets \tfrac{3}{2} I - \tfrac{1}{2} B\). This technique is known as unsharp masking. To increase contrast in an image update each pixel by applying \(I \gets \text{clamp}( \alpha I + \beta\mathbb{1})\), where \(\mathbb{1}\) is the matrix full of ones, and '\(\text{clamp}\)' restricts each value of a given matrix to \([0,255]\). This results in higher pixel intensities and therefore stronger contrast.
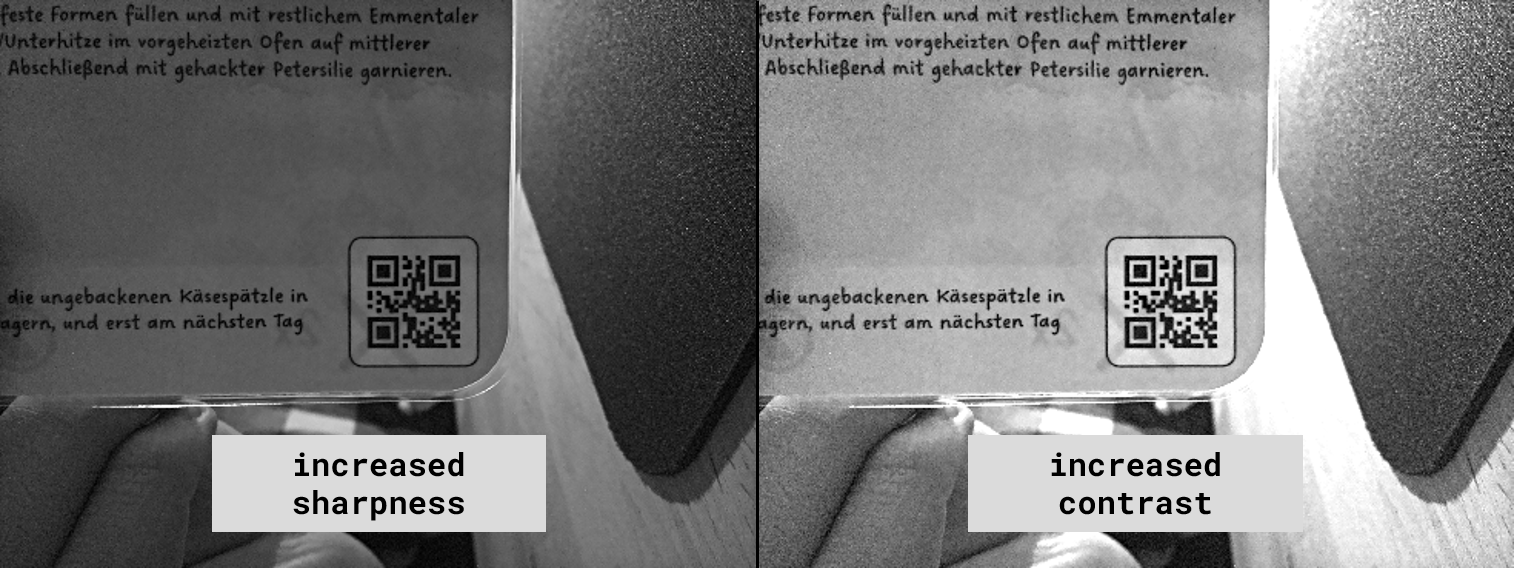
Boosting QR-code visibility by sharpening and increasing contrast.
The final image can then be handed over to OpenCV's
PY
                        # optionally increase sharpness (boost contours)
                        if sharpness:
                            blur = cv2.GaussianBlur(frame, (0,0), 3)
                            frame = cv2.addWeighted(frame, 1.5, blur, -0.5, 0)

                        # optionally increase contrast (boost visibility)
                        if contrast:
                            frame = cv2.convertScaleAbs(frame, alpha=2, beta=0)
Increasing sharpness and contrast of the image.
Putting everything together yields the following function. If you check the full
project code it is the main thing running in an endless loop when the scanning device
starts. Note that I removed some debugging statements as well as some other details
for improved clarity (marked with
PY
                        def scan_qrcode(
                            scale: float = 0.3, sharpness: bool = False,
                            contrast: bool = False, debug: bool = False) -> str:
                            """Capture a frame, apply processing, detect qrcode."""

                            # capture frame and always convert to grayscale
                            frame = camera.capture_array("main")
                            frame = cv2.cvtColor(frame, cv2.COLOR_RGB2GRAY)

                            # always downscale to boost detection performance
                            h, w = frame.shape
                            size = (int(w * scale), int(h * scale))
                            frame = cv2.resize(frame, size)

                            # optinonally increase sharpness and contrast #

                            # finds data, bounding box, and reconstructed qrcode
                            try: data, bbox, qrcode = detector.detectAndDecode(frame)
                            except Exception: return "" # dismiss detector errors
                            # give user audio feedback if success #

                            return data
Final function to try getting QR-code data from an image.
Creating Shopping Lists
To create a shopping list from scanned recipe IDs, we first need to get the
corresponding data. This is done by reading from
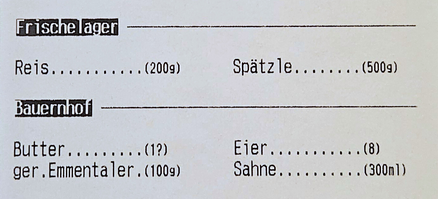
Two sections of the list displaying items and their quantities.
Furthermore, there is a
PY
                        ShoppingList.add_recipe(self, recipe: dict) -> None:
                            """Add `recipie` to list by saving its name and items."""
                            # save recipe name to overview section
                            recipie_item = { "name": recipe["name"], "qtys": "1" }
                            self._add_item(recipie_item, self._date)

                            # add each ingredient by its batches
                            for item in recipe["items"]:
                                # additional qty-string cleanup #
                                for qty in item["qtys"].split(self._seperator):
                                    sub_item = { "name": item["name"], "qtys": qty }
                                    self._add_item(sub_item)
Adding recipe data to the shopping list.
Adding an ingredient to the list starts by identifying the section it belongs to,
which we can look up in
PY
                        ShoppingList._add_item(
                            self, item: dict, item_sec: str = "Sonstiges") -> None:
                            """Add an `item` to its correct section."""
                            # find section the item belongs to
                            for section in section_data:
                                if item["name"] in section["items"]:
                                    item_sec = section["name"]; break

                            # find idx of item in section #
                            # if no match found add item as is else update qtys
                            if idx == -1: items.append(item)
                            else: self._add_qtys(target=items[idx], delta=item)
Adding or updating an item to/on the shopping list.
To correctly add a new batch to an existing qty-string first split both it and all
existing ones into their numerical value and unit. This is handled by
PY
                        ShoppingList._add_qty(self, target: dict, delta: dict) -> None:
                            """Add `delta` item with single qty to `target` item."""
                            # split and convert all quantities into value and unit
                            d_val, unit = self._split_qty(delta["qtys"])
                            t_qtys = [
                                self._split_qty(t_qty) for t_qty
                                in target["qtys"].split(self._seperator)]

                            # find idx of matching target quantity #
                            # update quantity if needed else just append
                            if idx != -1:
                                t_val = t_qtys[idx][0]
                                new_val = float(t_val) + float(d_val)
                                t_qtys[idx] = (new_val, unit)

                            else: t_qtys.append((d_val, unit))
                            # rejoin everything back into single string #
Adding or updating a batch to/on the shopping list.
Printing the actual shopping list is now just a matter of outputting a representation
of each section in
Assembling The Scanner
As already mentioned, this project involved handling quite a few physical components.
In this chapter, we will cover assembling and setting up the scanner device. If you
wish to recreate this project, you can download all required files
here; this includes a template for the recipe cards, the STL files for
both the stand and the scanner, and a complete parts list. At some point, I will
likely
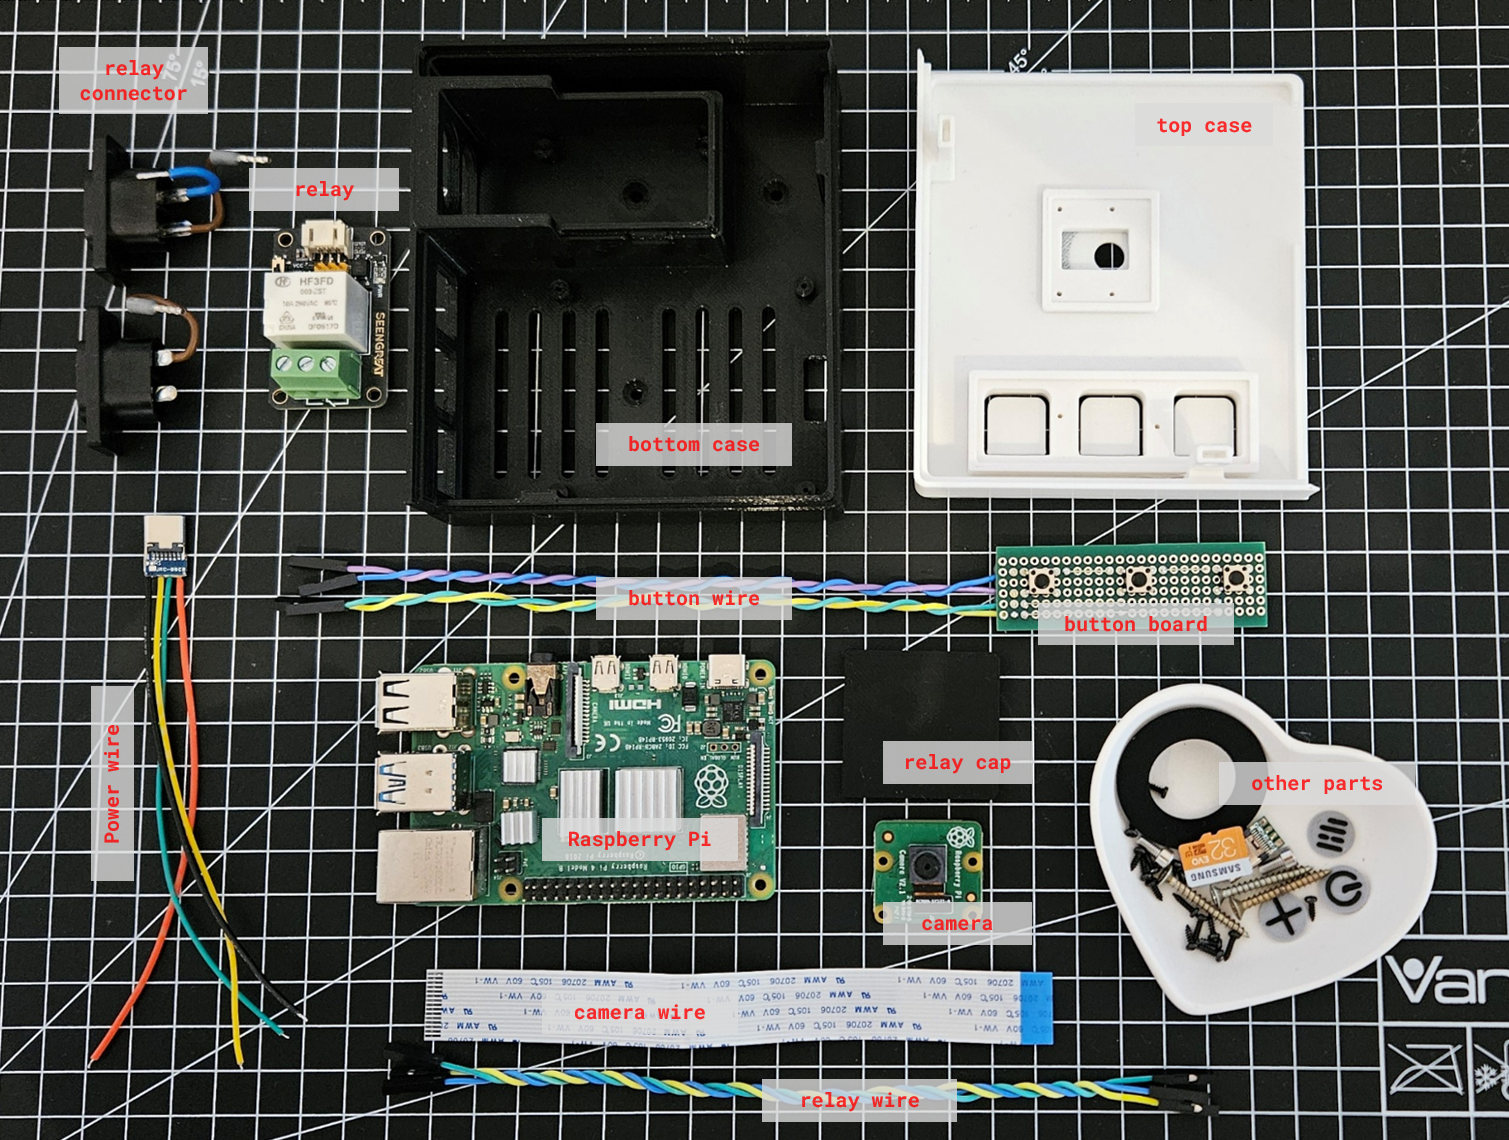
All the scanner components neatly laid out.
There are three major areas to the device: the white top case housing the camera and the button board; the small relay compartment in the black bottom case, used to switch the printer on and off; and, of course, everything related to the Raspberry Pi. Starting with the first area, both the camera and the button board are mounted in a complementary recess at the back of the top case. The buttons themselves are standard PCB buttons, however, I designed pressable areas directly above them in the top case to achieve a more premium look and feel.
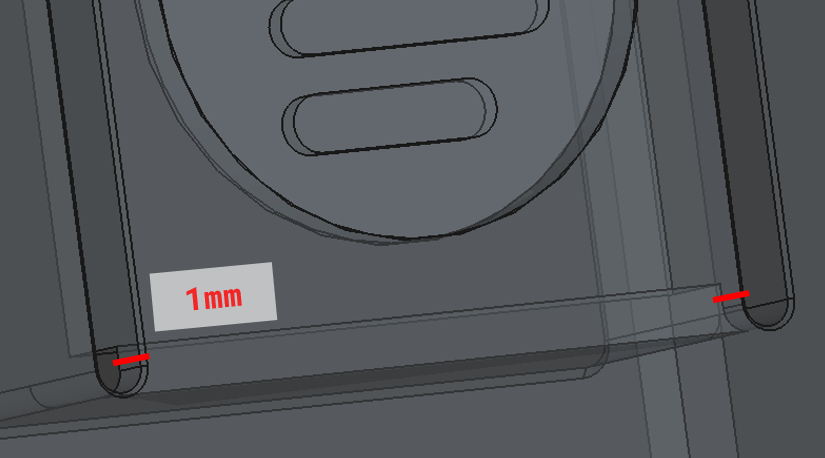
Creating a pressable area by using a thin connection.
Next, the relay is used to toggle mains power to the printer, which in Germany is \(240V\) AC. As such, I designed a separate, enclosed compartment with a dedicated cap so it doesn't interfere with any of the low-power components. To better understand how everything is connected, take a look at the project's wiring diagram.
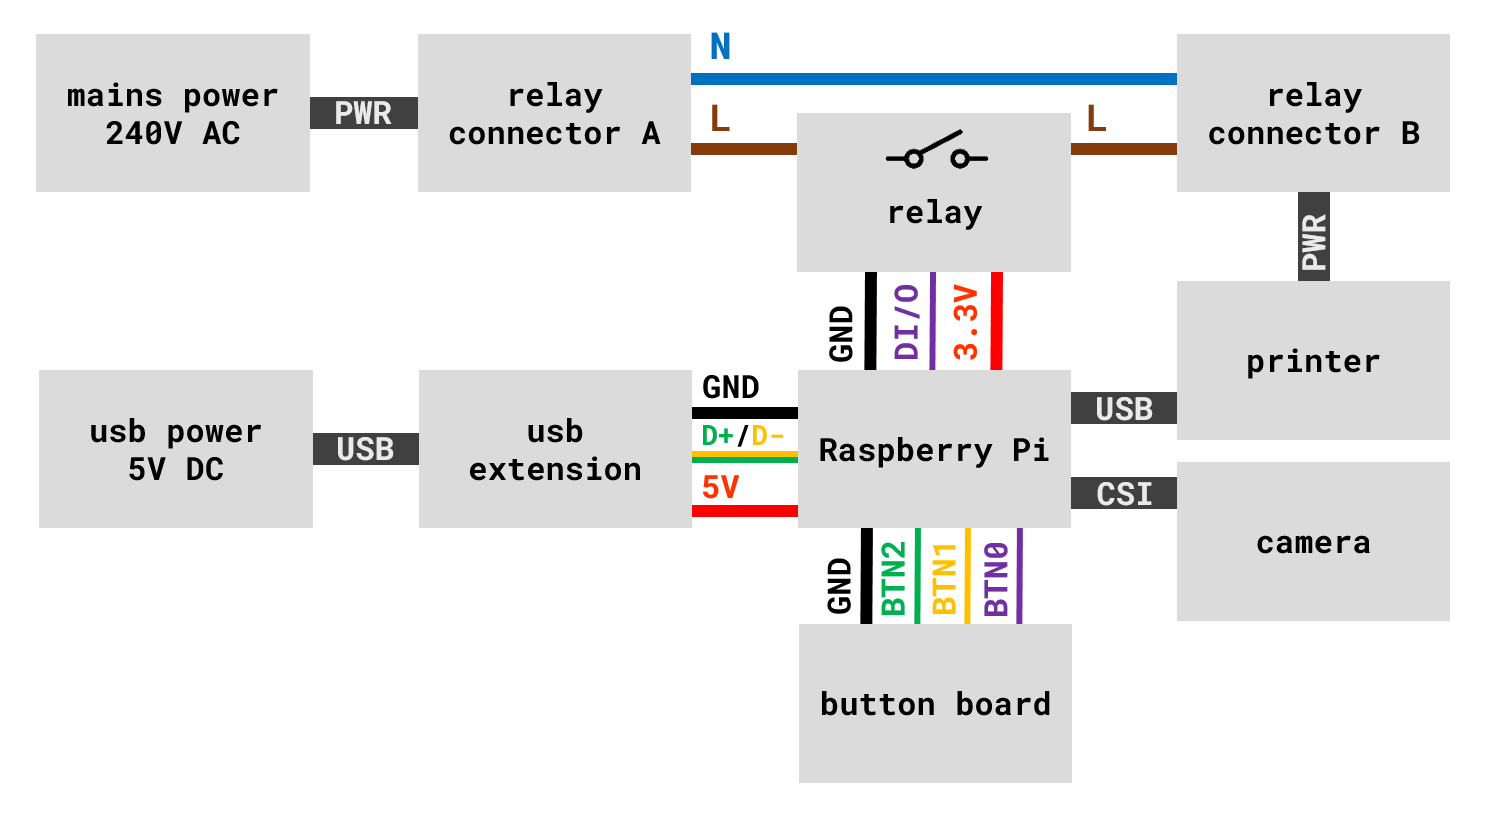
Wiring diagram of all the scanner components.
I've opted for a simple diagram instead of a full schematic, as this project doesn't involve any custom circuits. If you are interested in seeing a proper custom circuit and PCB design, take a look at this other project of mine, about automating backups to an external SSD. The final assembly step is mounting the Raspberry Pi itself along with its USB power extension cable. After that, all cables can be connected and the case can be closed.
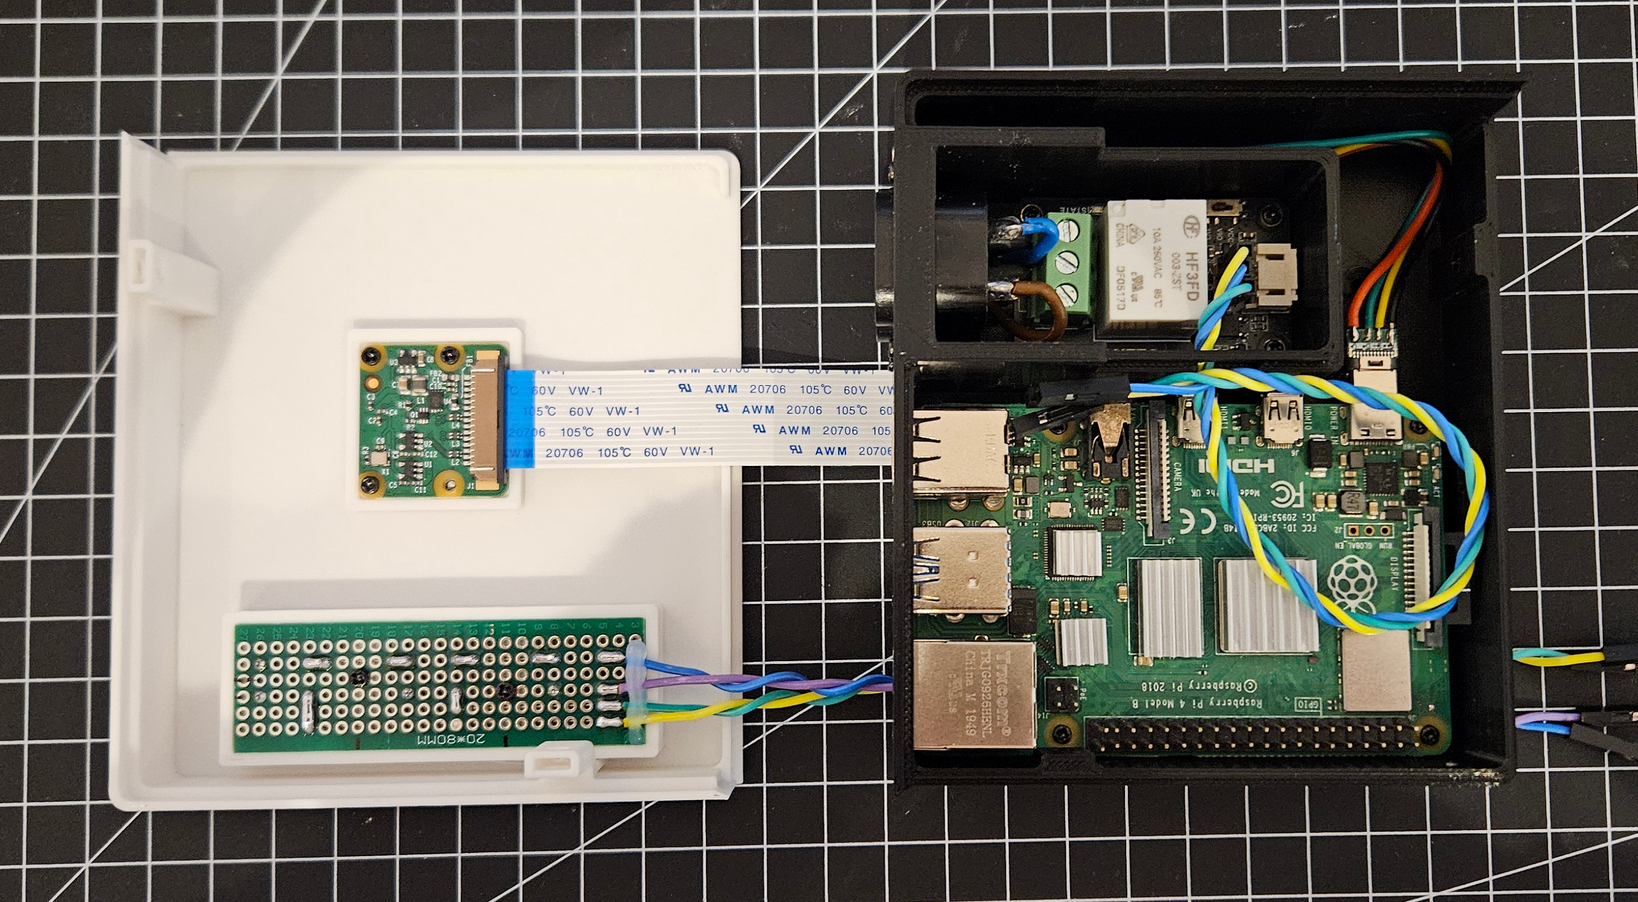
Both case parts with all components mounted.
With the hardware fully assembled, the actual last thing to do is the software setup.
Once the Raspberry Pi is powered on, it should start the
BASH
                        sudo nano /etc/systemd/system/printer.service
                        sudo systemctl daemon-reload
                        sudo systemctl enable printer.service
Setup commands to run our script after start-up.
The most important requirement for our system service is that it should start as early
as possible. To ensure this, we start it right after
TXT
                        [Unit]
                        Description=Shopping List Printer
                        DefaultDependencies=no
                        After=local-fs.target systemd-udevd.service
                        Before=multi-user.target

                        [Service]
                        ExecStart=/usr/bin/python3 /path/to/project/main.py
                        WorkingDirectory=/path/to/project
                        Restart=always
                        User=username

                        [Install]
                        WantedBy=multi-user.target
System service corresponding to the printer script.
Final Thoughts
When I first became interested in cooking, I never imagined creating such a complete system for myself. In fact, it developed quite naturally over time. I began by simply printing recipes and annotating them manually, which later evolved into typing my own clean digital versions. From there, I wanted to include my own photos, an idea eventually leading me to the creation of recipe cards. At first, these cards were just stored loosely, prompting me to design a dedicated stand for them. Finally, the addition of QR-codes brought everything together, enabling the automated printing of shopping lists as discussed above.
If this project has inspired you to create something similar yourself, feel free to reach out to me, whether to share your results or to ask any questions along the way. And if you've ever felt lost when choosing a recipe in the first place, you might enjoy this article of mine, discussing optimal stopping problems and the so called \(37\%\)-rule. Finally, thank you so much for reading all the way to the end!